Draw Something - Anything!
Now we’re finally at the stage where we can start drawing some proper 3D graphics. As we have seen before, emscripten allows us to use the OpenGL API in our C++ code base, and then it will automatically perform the mapping to WebGL to make it work in the browser. So to recap: The original C++ code uses the DirectX API, which we will implement as a layer on top of the OpenGL API, and then emscripten will convert all of that to WebGL in the browser. Nice and simple…
This is the third post in a series about recreating the Stunt Car Racer game for modern platforms. In the first post we went through why I want to do this. I found the Stunt Car Racer Remake project on SourceForge which is a C++ code base very specifically targeting Windows and DirectX. I want to make this run in a browser using the amazing emscripten framework, which, as we are realizing, involves implementing a whole lot of Windows and DirectX APIs using standard C/C++ and OpenGL.
In the second post we got the C++ code compiling and running just enough to not crash when performing the game loop, but with no graphics at all. Now we want graphics!
Reading time: 10 minutes.
OpenGL Crash Course
OpenGL (Open Graphics Library) is an API that is built for rendering 2D and 3D vector graphics, and it allows us to do so using the underlying graphics processing unit (GPU) present in practically all desktop computers nowadays. The way it works is basically you throw arrays of vertex information at it, tell it what primitives the vertices represent (line segments, triangles, or another primitive), and you will end up getting these primitives rendered on the screen.
But you need to set up OpenGL: First, you need to properly set up a so-called OpenGL context, which involves a whole lot of parameters like where you want the results to be rendered, whether you want depth testing (so that objects in the background are not painted in front of objects in the foreground), etc. And then there’s this thing called “shaders”.
OpenGL defines two kinds of shaders: Vertex shaders and fragment shaders. They are (usually) small C++ programs which OpenGL will run in parallel on the input data.
A vertex shader takes as input the vertex information you provide in the aforementioned array, and its job is to transform each input point to the proper display coordinate, which means applying various translations, rotations, camera movement, and perspective to eventually map your 3D graphics onto your 2D monitor. These transformations are usually represented as three matrices: The world, view, and projection matrix. A matrix is a two-dimensional grid of values which can be multiplied with other matrices or coordinates to further yield other matrices or coordinates. I won’t get into the specifics of matrices here, but you can find plenty of information on Wikipedia. The reason matrices are interesting for doing 3D graphics is that you can create matrices that will translate and rotate a point if you multiply the matrix with that point, and furthermore you can compose several matrices representing rotations and translations into a single new matrix that does all of these operations in one fell swoop.
A vertex shader in OpenGL is written in C++, and it might look like this:
attribute vec3 vPosition;
uniform mat4 projectionMatrix;
uniform mat4 viewMatrix;
uniform mat4 worldMatrix;

void main() {
  gl_Position = vPosition * worldMatrix * viewMatrix * projectionMatrix;
}
You may be wondering what attribute and uniform mean, and why we are using 4-dimensional
matrices (the mat4 type) when we are creating a 3D game. We will get back to this in later
posts. The job of the vertex shader is to set the value of gl_Position to the screen position
of the 3D point vPosition given to the shader.
So, the vertex shader is being called for every vertex you want to draw. The fragment shader,
on the other hand, is being called for every pixel rendered on the screen in order to determine
the color of that pixel. It has to fill out the gl_FragColor value, just like the vertex shader
has to fill out the gl_Position value.
That’s the overall idea of OpenGL. Then there are all the details: How do you pass a matrix to OpenGL - do you write it “row-oriented” or “column-oriented”, i.e., do you lay out the individual values by going row by row or column by column? Exactly how do you create a translation, a rotation, and a perspective matrix? How about textures? Which 2D points in OpenGL correspond to the top left and bottom right on your screen? How exactly do you map from types in your C++ program to values in the shaders? How about the depth testing I mentioned earlier?
There are many, many small things to tackle, and if you screw up just one of them, OpenGL will leave you with a black screen and no clue what went wrong. And to make matters worse, a lot of the details mentioned above are different between OpenGL (which we can use in emscripten) and Direct3D (which the Stunt Car Racer code is using). So let’s start somewhere simple.
Drawing a Static Triangle
We could have started by implementing everything mentioned above and hope for the best, but chances of us getting everything right at first try would be close to 0. At least that’s the case for me. As mentioned earlier, I am not a real games programmer, so I don’t have much experience with OpenGL or DirectX.
So I decided to start by copy-pasting some very simple code into the Stunt Car Racer codebase, just to draw something. Luckily, emscripten has some example code based on “OpenGL ES 2.0 Programming Guide” by Dan Ginsburg and Budirijanto Purnomo.
I copied a very simple triangle example, and it looks like this:

Not super impressive, but it’s something!
Hacking Our Way to Displaying a Track
With a tiny hack, I got the actual track shown on the screen. The code does this:
for (int i=0; i<3*PrimitiveCount; i++) {
  POINT3D *p = (POINT3D *)((int) currentStreamSource->data + i*currentStride);
  int divideBy = 50000;
  p->x /= divideBy;
  p->y /= divideBy;
  p->z /= divideBy;
  p->x -= 0.5;
}
So it’s just shrinking all the points and moving the X coordinate so that we can show them with a very simple vertex shader which doesn’t do any transformations. The result is a weird, red, “flat” version of the track:
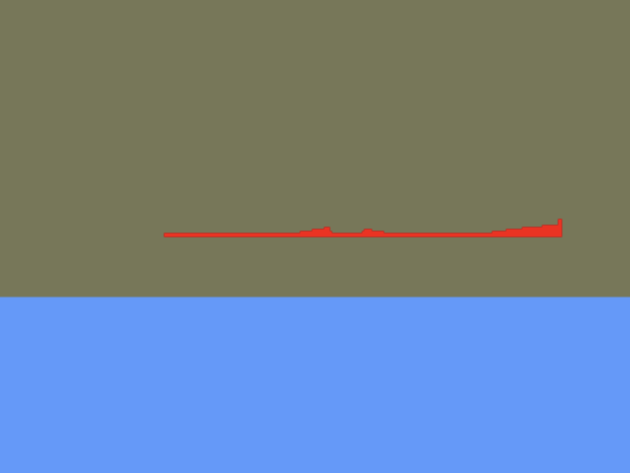
In the middle of the track you can see a jump, and to the right you can see an elevated corner.
You may not think this is impressive. Also, you may notice that the background is drawn, but it’s upside-down. But this was a major milestone for me! I now knew that the track data was being read properly, and that I could pass the vertex data on to the OpenGL pipeline.
Matrices!
To get the proper rotation, translation, and perspective working, now we need to make all the matrix operations work. Some of the matrices are actually very well documented by Microsoft, while others are not quite as well documented (but still very decent!).
For those matrix operations that are not documented in-depth, I could have tried to get everything right by reading up on exactly how to create e.g. a rotation matrix and writing it all down. But working at GitHub, I had early access to GitHub Copilot, which is amazing technology: By just writing the signature of a function, Copilot will automatically suggest the function body. Have a look at this:

All of the gray text is what Copilot comes up with. It even sees that in other functions in this file, I prefer to print out the name of the function (for debugging purposes), and it points me to the documentation, which in this case is not specific enough to write the code from. It also uses the same style of dividing the logic into chunks for each row in the matrix as I am using elsewhere.
I decided to mostly just go with Copilot’s suggestions.
Perspective, Motion, but Only One Color
Getting the matrices in place (at least well enough for now!), we finally can draw something that looks right:
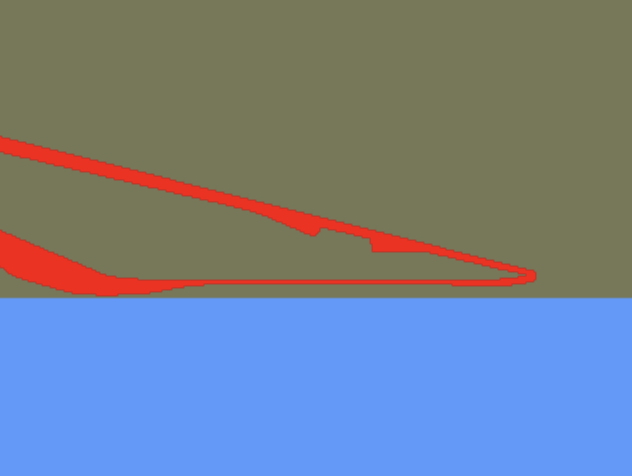
I had to make small adjustments here and there in the matrices to make the result render correctly in the OpenGL view area, since the matrices were initially created to follow Direct3D conventions (right-handed vs. left-handed coordinate system and a different view clipping space). But it looked good. Still upside-down because I was too lazy to fix this.
With a tiny bit more work, we can correct the Y axis, we can draw the background as well, and if we also enable the game loop, then the existing Stunt Car Racer C++ code will make the track rotate for us:
The captured gif is not super fluid. It looks better in real life, I promise 😀
How About the Colors and Everything Else?
Getting colors working was surprisingly difficult and required a bit of hacking, so that is material for another blog post. We also haven’t got keyboard input working, which will reveal a bunch of issues with the code base we have arrived at now.
And by the way, as mentioned in previous posts, you can try the currently most up-to-date version of the game here - yes, there are colors: https://olefriis.github.io/play/
I’ve skipped a bit quickly over the matrices and how the OpenGL shaders turned out. There is a lot of interesting stuff to learn about matrices: How you translate, how you rotate, and how you add perspective. So that will be the content for the next two posts. Hope to see you there.